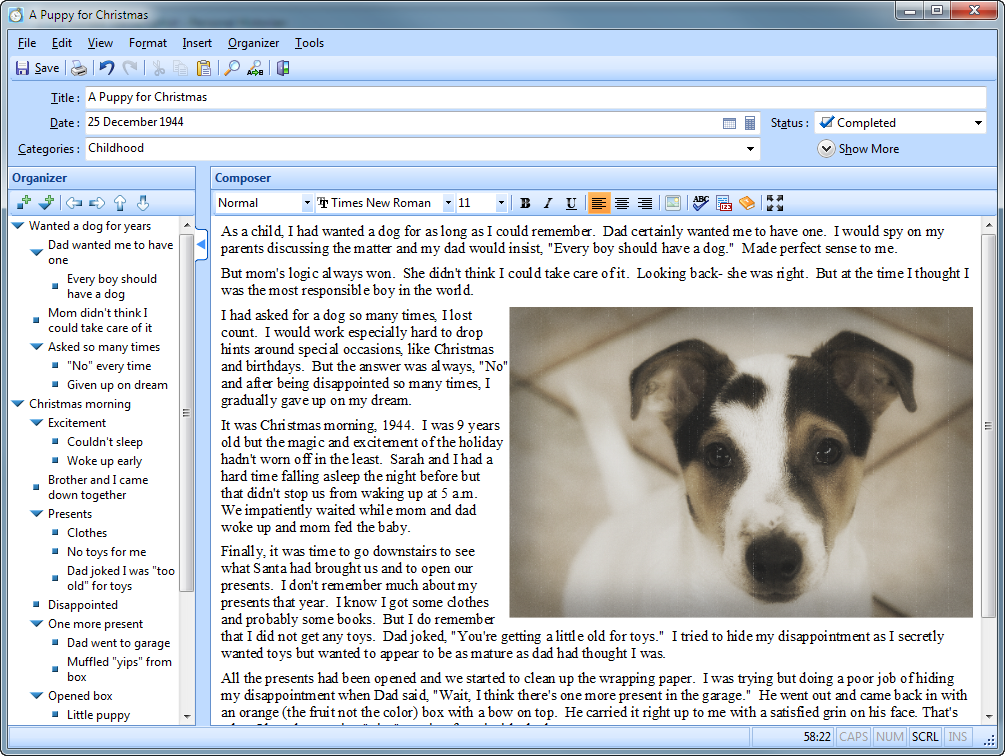
As I mentioned last time, putting together a personal history is as simple as writing some stories. You don’t have to write your stories in any particular order… Personal Historian will arrange them for you as you create them. So if you remember something that happened in the 4th grade, just click “Add Story” and write about it. Personal Historian will bring up a screen like this to write your story (you can click on the image to see it larger).
The story writer has three sections: 1) information about the story such as the title, date, etc, 2) a story editor to write your story and 3) an organizer to help put your thoughts together. As before, features new to version 2 will be bolded.
Story Information
When you write a story you can also include a title, the date (or date range) of the story, and the status of the story (are you still working on it, finished, or have you not even started yet). These additional items are shown in the story list on the main screen and help you organize your stories.
But the real power of this additional information is the ability to categorize stories, and to tag a story with the people and places mentioned in the story. This information can also be included in the main story list, but its main purpose is to help with selecting stories. Imagine being able to say “Show me all the stories that occurred within 50 miles of Ames, Iowa“, or “Print just the stories that refer to one of these 5 people”. And new in version 2 is the ability to assign a story to more than one category.
Word Processor
A big chunk of the feature requests for Personal Historian have to do with the story editor, so we spent a lot of time working on that. The number one feature request was to allow text to wrap around pictures, and as you can see above, that wish has been granted. Also new in version 2 is the ability to use multiple fonts in your stories. But we didn’t stop there. You can now create “styles” (which include font, attribute, and paragraph settings), and apply those styles to paragraphs in your stories. If you change the settings for a style, that change will affect all paragraphs using that style.
If you have wanted more room to edit your stories, you can now click a button to toggle in and out of full screen mode. And if you are the kind of person who likes to document your stories, Personal Historian now supports footnotes.
There are also a number of tools to help you write better, but we’ll talk about them in an upcoming article.
Organizer
Remember back when you had to write a paper in school? Your teacher probably told you that you could write better if you first created an outline of your story. Did we listen to that advice (probably only if our grade depended on it). But those teachers were right, and Personal Historian provides an organizer that makes it easy to create an outline. Just begin typing ideas into the organizer, but don’t worry about what order those ideas are in. Just brainstorm and type everything you can think of that you might want to include in the story. The organizer then lets you easily drag and drop all those ideas into an outline. That outline is always available and is saved along with your story.
Coming Up
So are you worried about trying to come up with ideas for your stories? In our next article I’ll tell you how to import story ideas from your genealogy software, and from there we’ll see how to use LifeCapsules for even more ideas (including a bunch of all new LifeCapsules in version 2).

After 30 years of semi-compiling my life stories in a rather disorganized, unsatisfying mish-mash,I’m so excited to find this all-inclusive program for putting it together as a professional would!