Tip: How to See When You Last Edited a Person in RootsMagic

Date Last Edited

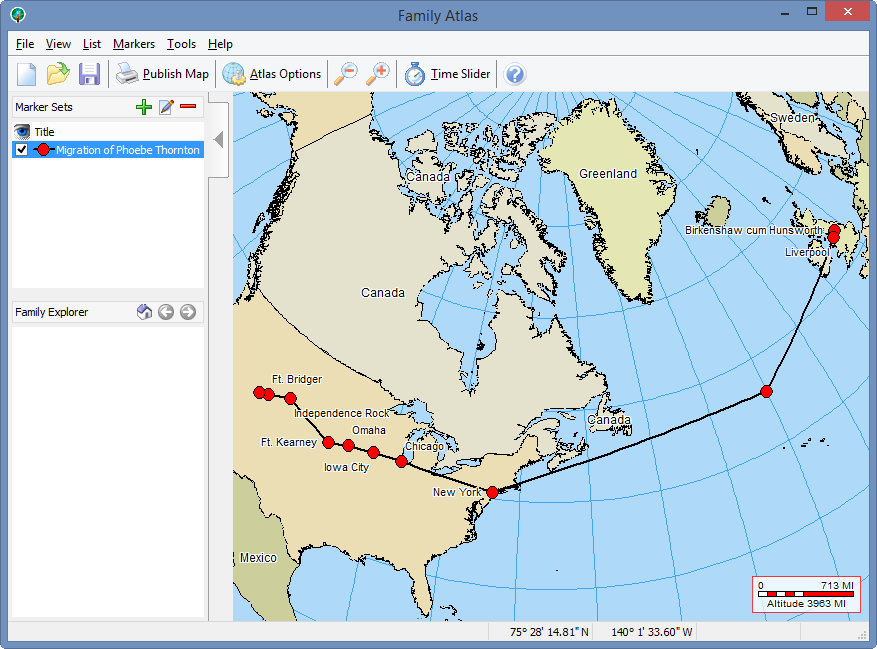
You stare at the list of names you have entered into RootsMagic over the years, and think to yourself “I wonder how long it has been since I’ve worked on that guy’s line?”.

As you make changes to your data, RootsMagic keeps track of the date you last edited each person.  You may not have noticed it, but if you look in the bottom left corner of a person’s edit screen, you will see the date you last made a change to that person.

2014-10-16_8-47-36


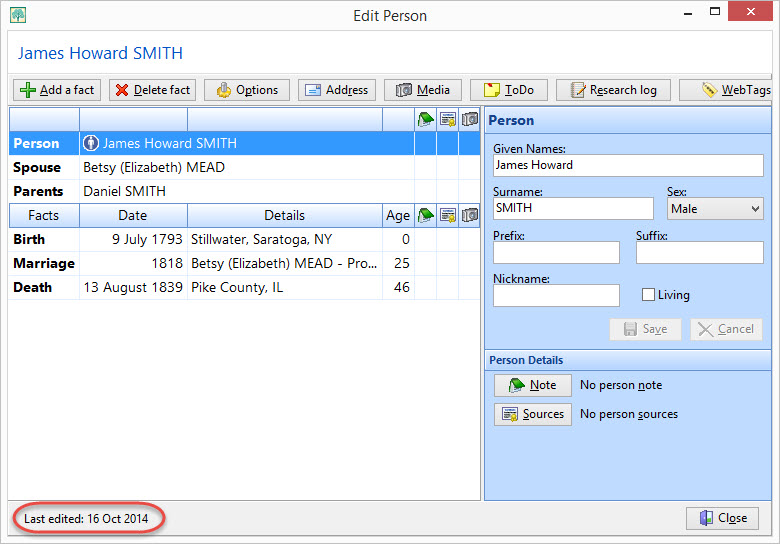
This is done automatically for you, and it isn’t something you can edit directly.  There are a number of useful purposes for the “Last Edited Date”, and I’m here to show you a couple of them.

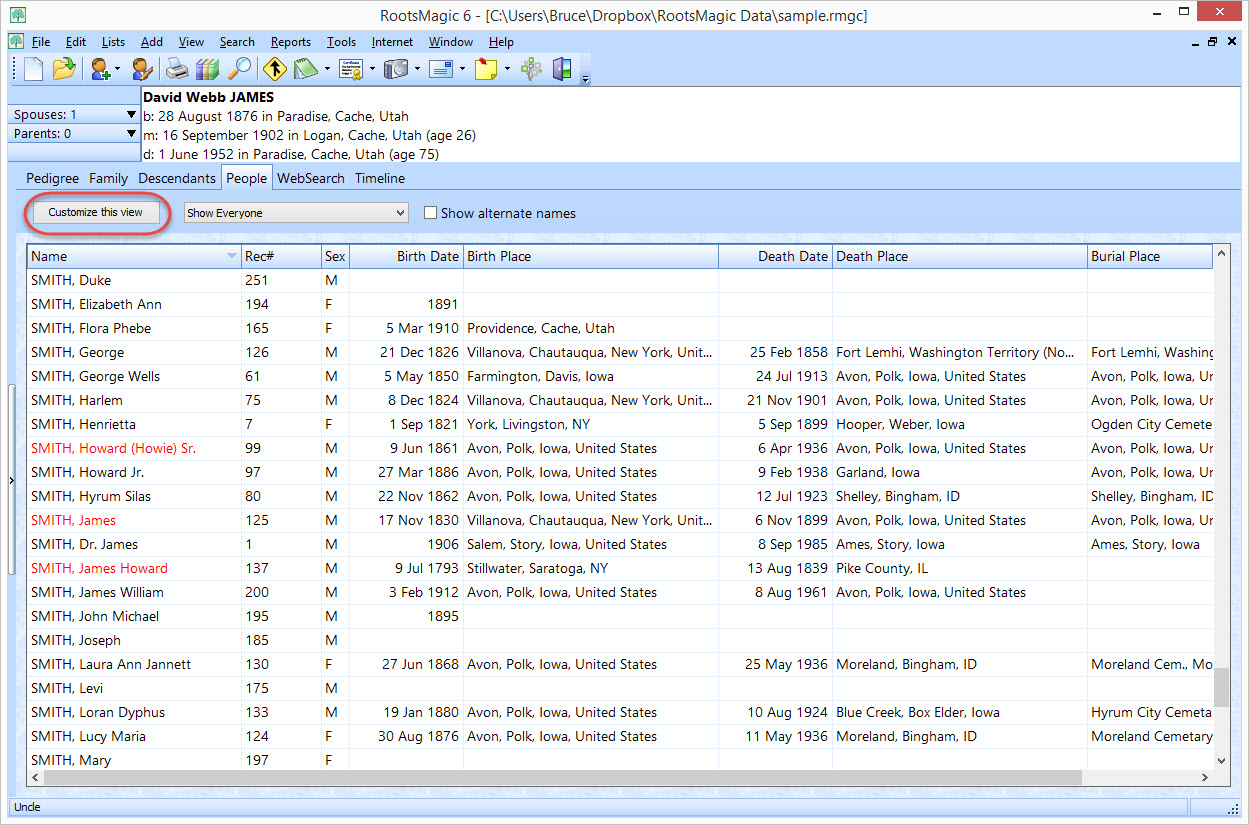
First, if you would like to just see which people you recently worked on, you can customize the People View in RootsMagic to not only display the date last edited, but also to let you sort your database by that date.  Switch to the People tab in RootsMagic, and click the “Customize this view” button.

2014-10-16_8-50-43

RootsMagic will open a form that lets you choose which columns you want to display in the People view.  On the left side are the available columns, and on the right side are the columns you want displayed in that view.

2014-10-16_8-52-37

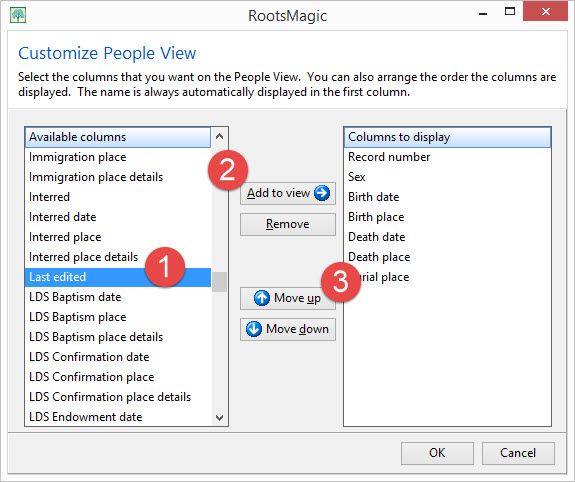
There are 3 steps to adding a column… 1) find and highlight “Last edited” in the list of available columns, 2) click “Add to view”, and RootsMagic will move that field into the right column, and 3) highlight “Last edited” in the right hand column and use the “Move up” and “Move down” buttons to choose which position to display that column.  I moved it to right after the “Sex” column as seen below, but you can put it anywhere you want (except the very first column which is always the person’s name).

2014-10-16_8-53-52

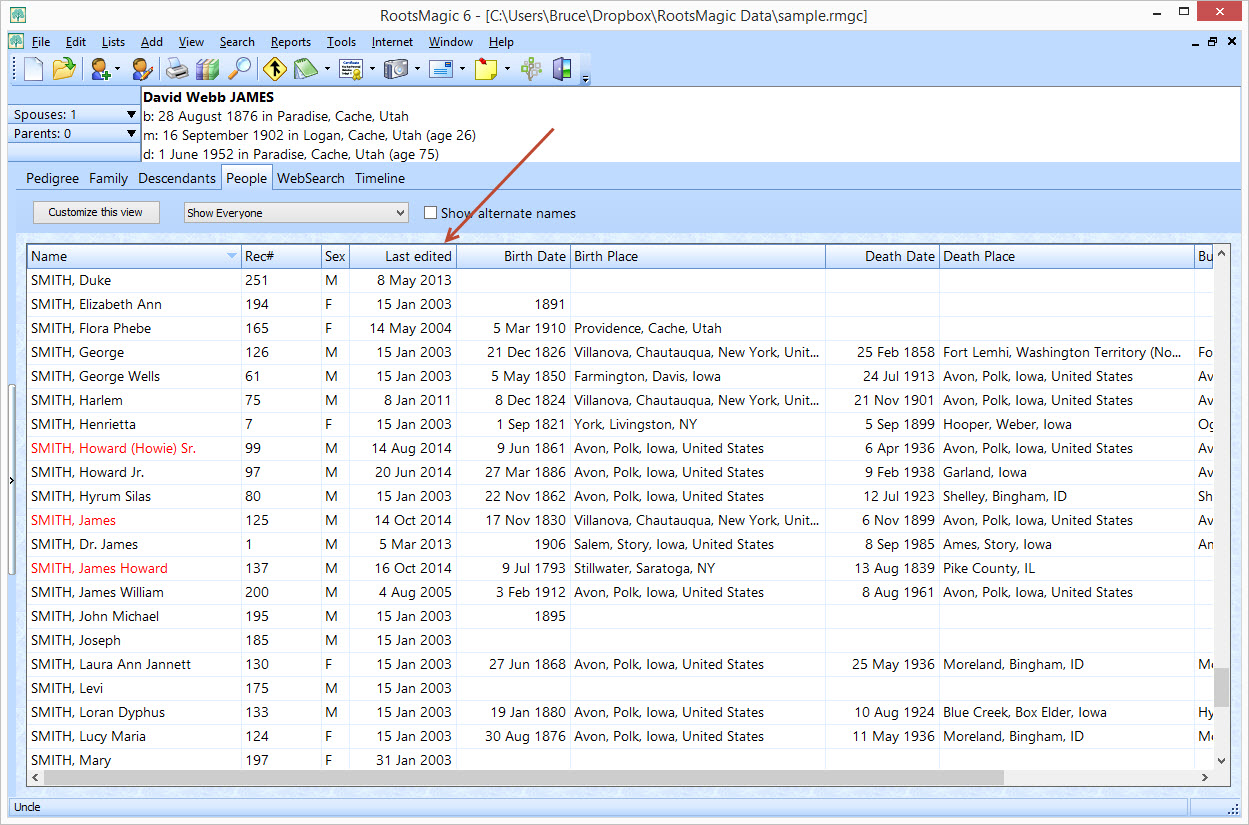
Once you have added the “Last edited” column, you can easily sort the People view on that date by just clicking the header over the column.  Clicking it a second time will sort the list in the opposite order.  You can quickly and easily see either the people you have edited most recently, or the ones you haven’t touched in the longest amount of time.

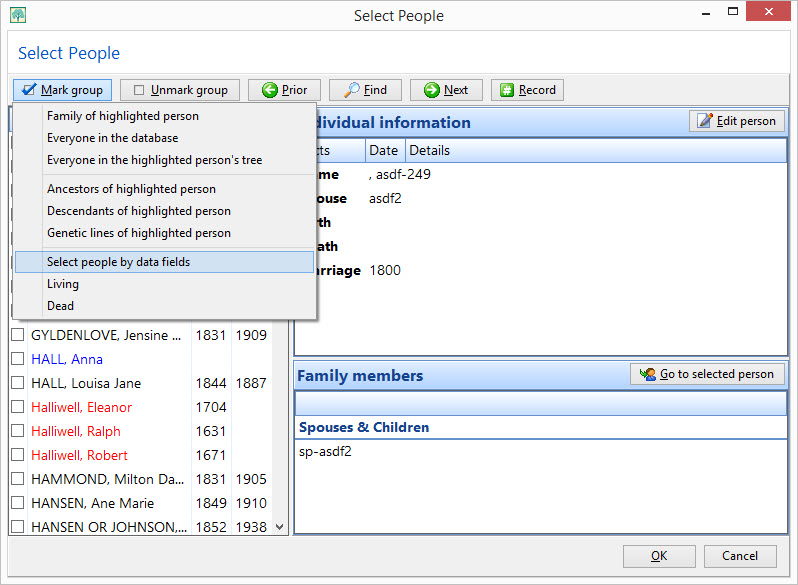
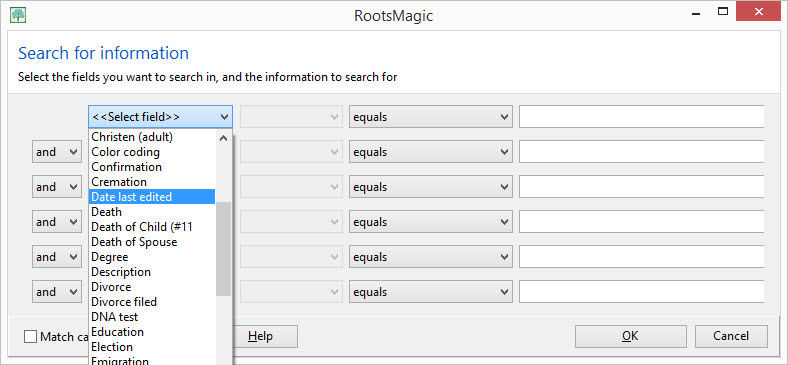
There are a number of other areas where you can use the “Last date edited”, but the most useful is probably when you are selecting people.  Whenever RootsMagic lets you select a group of people for something (such as a report, creating a GEDCOM, or creating a named group), it will display a list of the people in your file where you can check (or “mark”) the people you want to select.  That screen will have a button named “Mark group” which will display a menu letting you choose to “Select people by data fields”.

2014-10-16_8-57-39

The screen that then pops up lets you enter the “criteria” for marking people, and one of the fields you can select by is “Date last edited”.  By selecting that field, you can select people whose “Date last edited” is before a date you enter, or after a date you enter, or you can even do something like:

Date last edited IS AFTER 1 JAN 2014

AND

Date last edited IS BEFORE 1 JUL 2014

to select people you edited between January and July of 2014.

2014-10-16_8-56-09

The “Last date edited” is available in most places where you want to search, select people, sort, or even display in custom reports.

So while you may not remember whom you last edited or when, RootsMagic does. And with a little customization, RootsMagic can give you exactly what you want to know.

Tip: Recovering Lost Registration Keys

Lost Key

Have you misplaced your keys again?  Not your car keys, but the registration keys for your RootsMagic software?  If so, you’re not alone.  Requests for lost or misplaced registration keys is our number one tech support issue, but you can actually retrieve them yourself.

Just visit our website at http://rootsmagic.com and hover over the Support menu at the top, then select Request a Lost Product Key.

2014-10-01_14-55-55

On the page that appears, enter your email address (the one you used when you ordered the software) and click the Request button.  All of your registration keys (for any products you have ordered from us), will be emailed directly to you.  You can then print out or save that email for future use.   The email will also include links to download the software associated with your key.

Lost Key Screen

So the next time you “lose your keys”, just follow these easy steps to have the RootsMagic locksmith help you out.

Tip: Customize the Add Person Screen to Save Time

Customize Add Person

Have you ever mumbled under your breath because RootsMagic didn’t include the field you always want to enter on the Add Person screen?

When you add a new person in RootsMagic, the first screen you see is the Add Person screen.  It allows you to quickly enter the name, sex and a few basic events before adding the person to the database and opening the full edit screen.  By default those “basic events” are birth, death, and burial. Depending on your research areas and methods, you may need to often enter other events such as christening, baptism, census, or wills. You can easily add and remove event types from this screen by clicking the “Customize this form” in the lower-left corner.

2014-09-30_7-01-06

When you click the Customize link, RootsMagic displays the Customize screen where you can add additional fact types to the form.  Click the “Add fact to form” button and you can select the fact type you want to add to the form.  There are a couple of limitations to the fact types you can add.  First, you can’t add an alternate name fact, since it is completely different from the normal fact types, and second, you can’t add a “family” fact type (like marriage, divorce, etc), since those facts are attached to families and not to an individual.

2014-09-30_7-01-18

Let’s say you decide to add a Christening field to the Add Person screen.  After clicking “Add fact to form” and selecting it from the list, the new field is added to the end of the list of fields.

2014-09-30_7-01-51

It’s easy to rearrange the order that the fields will appear.  Just click to highlight any field, then use the arrow buttons on the screen to move that field up or down to the desired position.  You can repeat this for any of the fields.  If there are any fields you don’t need, just highlight that field in the list and click the Delete button.

2014-09-30_7-02-07

Once you have added the fields you want, and have rearranged them as desired, click the OK button and RootsMagic will return to the Add Person screen with the new set of fields you selected.  You can continue adding the person, or just cancel from the Add Person screen and RootsMagic will remember your layout when you add people in the future.  If you add more fields to the Add Person screen than can be displayed, RootsMagic will add a scroll bar to the screen so that you can scroll down to the additional fields you add.

2014-09-30_7-02-17

So if you find yourself constantly adding a particular fact to everybody you enter, spare yourself the mumbling and take a second to add that field to your Add Person screen.


Tip: Finding Errors in Your Data with Problem Alerts

Problem Alerts

Have you ever noticed a little triangle symbol next to a person’s name in RootsMagic and wondered what it meant?  It means there just might be a problem with some of the information you have entered for that person.  That little symbol is called a “Problem Alert”, and will show up if RootsMagic thinks there is an issue you might need to look into.

2014-09-03_11-23-22

To see what RootsMagic wants you to check out, just click on the little symbol and the problem list will open for that person.  There may be just a single problem, or there may be multiple problems.  Some problems are limited to just that person, like dying before they were born.  Other problems might require looking at more than one person to figure out, like being born before their parents.

2014-09-03_11-25-26

In addition to displaying a list of potential problems, the problem list also gives you a number of things you can do with the highlighted problem.  Edit Person will open the edit screen for the person, which is great for those individual problem types.  Edit Family will open a screen listing all of the family members for those problems which may lie with either the person or a family member.  And sometimes a potential problem isn’t a problem at all (maybe great aunt Martha really did live to be 106).  The Not a Problem button tells RootsMagic that the highlighted item isn’t really a problem and should be removed from the list.  And what if you don’t have time right now to figure out what the problem is?  You can click Add to To-Do List to put that potential problem in the person’s to-do list so you can work on it later.

If for some reason you don’t want problem alerts to appear, or if you want to choose what types of problems RootsMagic should look for, do “Tools > File Options” from the main menu, then check whether to use the alerts or click the “Problem options” button.

2014-09-03_11-22-06

When you click “Problem options”, the following screen will let you choose which problems RootsMagic will look for.  In addition to selecting the types of problems, you can also adjust the range of values RootsMagic uses for various problem checks.

2014-09-03_11-22-56

If you want to see Problem Alerts in action, here is a short video we put together for you.

So don’t wait around to see if there are any problems in your data… let RootsMagic find them for you automatically!

Tip: Keep Your File in Shape with Database Tools

Database Tools

Occasionally things break.  And when they do, we break out the tools to fix them.  Sometimes we even use tools preemptively to keep things from breaking later.  Databases are no different, and RootsMagic provides database tools to check the integrity of your database, or even fix issues like “phantom children” in your database.  To open the Database Tools, select File > Database tools from the menu.

2014-08-25_15-31-33

The Database Tools screen is very simple, with 4 commands to choose from.

2014-08-25_15-32-36

Each of the 4 commands simply performs the command and then pops up a status message (which may be no more than a simple “OK”).

Test Database Integrity

This command analyzes your RootsMagic file to check if there are any problems with the database structure itself.  These are not problems with data (like a person being born before their father), but are corruption within the data structure itself.  This type of corruption is rare, but it is important to check for it occasionally.

When this command finishes running it will either just display “OK” (which is what you want), or it may display a list of any corruption in the file.  Sometimes this corruption can be fixed by running one of the other database tools (like Rebuild Indexes), but sometimes the only recourse is to restore a backup.

You can run this command when you open your database to make sure there is no corruption before you start entering new information, or you can run it before creating a backup to make sure your database is good to go before backing it up.

Rebuild Indexes

Your RootsMagic file contains two things… data and indexes.  The data is what you actually type in (names, dates, places, notes, etc), while the indexes are what the RootsMagic database engine creates so that it can search for and find that data faster.  This command rebuilds those indexes.  Like any of the database tools, you can run this command anytime without worry, but it can be most useful if the Test Integrity check comes up with index errors.

Clean Phantom Records

This is probably the most useful of the database tools, or at least the one that you can see its effects.  Occasionally your database can pick up what we call “phantom records”.  These are unwanted pieces of information (sometimes blank) that appear in your database, but you are unable to remove them using the normal RootsMagic features.

For example, you may find a family with a “phantom child”… a blank row in the child list on the family view which you can’t unlink or delete using the regular Edit > Unlink or Edit > Delete commands.

This command will search your file for all kinds of phantom records and will remove them for you.  Again, it doesn’t hurt to run this feature even if you haven’t run across any phantom records yet.

Compact Database

When you delete a person or other item in RootsMagic, the program simply marks the record as deleted, but doesn’t free up the space the record was using.  Normally this isn’t a real problem, but if you are deleting a lot of records in RootsMagic, this command will reclaim that space and reduce the size of your RootsMagic file.

Database Tools in Action

Here is a short video we created showing the database tools in action.

Tip: Keep Private Notes Private

Private Notes

You just discovered some information about an ancestor that you want to document, but you know there are some family members that are going to throw a fit about it.  How do you document that information, yet be able to publish your family tree without sharing that information?  The answer is with private notes.

Private notes are available anywhere you need to enter a note: a person note, a family note, or an event note.  Go ahead and enter your note just as you normally would, even if it contained something you weren’t quite ready to share.

2014-08-14_17-06-10

When you print the note in a report (like the narrative report here), the note will print exactly as you entered it, including the information you’d like to keep private (you can click on the image below to see it better).

2014-08-15_10-53-47

So here’s how to privatize that information.  Just surround the text you’d like to keep private with curly brackets {these things}.  Notice below we put them around the text about the cousin being too drunk to deliver the baby.  You can see that it isn’t all or nothing… you can put the braces around any text buried inside the note, or around the total note.  You can even put braces around more than one thing in a single note if you have multiple items you want to keep private.

2014-08-14_17-07-10

Once you have added braces around the private text, you can choose in any report that prints notes, or when creating a GEDCOM file, to have that private text included or removed.  For example, when printing a narrative report, click the Options button…

2014-08-14_17-08-32

then on the Options screen you will see two items for you to choose how to handle the text between braces.  The first “Include private notes” lets you choose whether or not to print or export that text.  The second option “Strip { } brackets” is used when you DO include the notes.  If you check that option when printing the private notes, RootsMagic will remove the braces so they don’t stand out around the private text.

2014-08-14_17-09-12

Here is that same report as above with the private notes excluded.  RootsMagic has completely removed any text (including spaces) surrounded by the curly braces.

2014-08-15_10-54-11

So the next time you stumble across information you aren’t ready to share yet, use this tip to keep track of the information while keeping it private at the same time.

Tip: Finding Anything Anywhere in RootsMagic

Find Everywhere

One of your ancestors fought alongside Davy Crockett at the Alamo, and you’ve entered that information into your RootsMagic database.  Unfortunately you don’t remember which ancestor it was, or how to easily find him.  Luckily, RootsMagic makes it easy to find anything, anywhere in your database with Find Everywhere.

Find Everywhere does exactly what it sounds like.  You enter some text, and RootsMagic will display a list of everywhere in your database that text is found: people, names, places, notes, sources, citations, media, to-do items, research logs, and more.  Just do Search > Find Everywhere from the RootsMagic menu and the following form will open.

2014-08-07_20-50-39

You can search for a single word or phrase by just typing it into the first field.  Or you can search for a combination of words / phrases by entering them into separate fields and using the And/Or options.  You can also choose whether you want the results to match by case also.  For example, if you mark “Match case”, then “Smith” and “smith” will not match.

Click OK and RootsMagic will return a list of every place your desired text is found (in our example, the word “smith”).  Here we can see that it found a number of people with the name smith, whether 1) as a given name, or 2) as a surname.  It will also show you if any person notes have the word “smith” in them also.

2014-08-07_20-51-06

 As we scroll down the list we can see that Find Everywhere returned sources with the word “smith” in them as well.  It doesn’t matter if the desired text is in the name, footnote, bibliography, research notes, etc., RootsMagic will find it.

2014-08-07_20-52-30

 Scroll down even more and we see 4) places, 5) place details, 6) to-do items, 7) research logs, and 8) media items with the desired text.

2014-08-07_20-52-52

 And best of all, notice how every result has a blue title.  That title is a link you can click on to directly edit that piece of information directly from the Find Everywhere results.  And of course you can also print or save the results using those buttons on the results page.

So the next time you can’t remember where you put that little tidbit about an ancestor, let Find Everywhere do the dirty work for you.

Tip: Finding a Person by Nickname or Married Name

Name Find

 “Why can’t I find that person?  I know I entered them into my database!”  Maybe it is because you know them by a different name than the one you entered for them.

We are taught to enter the full birth name for a person, but that person may have changed their surname when they got married, or may have gone by a nickname.  If you do a simple search for that married nickname, you probably aren’t going to find them.

This is where a great feature called NameFind comes to the rescue.  Let’s say you are looking for Mary Smith.  You open the RootsMagic search list (Search > Person List or click the magnifying glass on the toolbar) but you don’t find Mary Smith in the list.  Here’s how you do it.

Just click the NameFind button on that list screen.

2014-07-31_15-09-18

That will open a form where you can enter the name of the person you are looking for.  Just type in the name of the person you are looking for and RootsMagic will begin its magic.   This screen looks quite simple, but is the gateway to a very powerful search which looks not only for a person entered with that name, but people who have that given name as their nickname, or that surname as a married name.  It even has an option to allow close matches, which will let it (for example) find Maria even if you looked for Mary.

2014-07-31_15-15-08

Once you’ve entered the name you are looking for (and clicked OK), RootsMagic will jump to the first person who matches.  Notice in this case we were searching for Mary Smith, but RootsMagic found Marianne Davis.  That’s because 1) Marianne’s nickname is Mary, and 2) she was married to George Smith.

2014-07-31_15-15-24

So there you have it- with RootsMagic’s NameFind, you can easily find anyone in your file, no matter what their maiden, married, or nicknames may be!

Tip: Make a Map of Your Family’s Migrations

Migration-Maps

Here at RootsMagic HQ, today is “Pioneer Day”, a local holiday where we celebrate our ancestors and the diverse peoples who settled this area. One fun project for Pioneer Day (or any day for that matter) is to make a map showing where our ancestors lived and how they migrated and moved about. There is just something special about looking at a visual map that communicates so much more than a printed list of places can.

FA-DVD-Box-Mockup

We happen to have a product which makes making these maps a snap. It’s called Family Atlas. Now, Family Atlas is a standalone program. You don’t need our RootsMagic software to use its features, although it can read your RootsMagic file as well as genealogy and map files from a variety of different sources.  One common use of it is to import your family data from your genealogy software and then create and print personalized family maps from that data. It is one-of-a-kind software that lets you visualize and publish your family history in a unique and compelling way. Be sure to read to the end of this tip to learn about a special limited-time discount on this software.

 When you first open Family Atlas, you’ll see a blank, interactive, zoomable world map. At this point, you need to add “Marker Sets” to add people, places, and events to your map. To do this, click on the Green “Plus” icon in the upper-left corner of the screen. The “Add Marker Set” screen will appear.

Migration-01

Click Place Marker Set and then OK. The “Edit Place Markers” screen will appear.

Migration-06

This is where you will add all the points that you want to plot on the map. First, give the marker set a title. Click Edit next to “Symbol” to change the color, shape, and connecting lines between each marker.  Click Add to add a new marker to this set. The “Edit Place Marker” screen will appear.

Migration-02

Add a label, date, and location for the marker. If Family Atlas recognizes the place, it will automatically add the Latitude and Longitude for you.  Click OK to finish adding the marker.  Repeat this last step for each marker that you wish to add.

Migration-03

Click OK to save your changes and return the the main screen. Here you can see your map. Pan and zoom the map however you wish. Feel free to explore the various details. You can click Atlas Options to change map colors, fonts, and more.

Migration-04

When you have the map colored and zoomed just as you want it, click Publish Map to take a snapshot of the map and open up the publisher tool.  Here you can add text, pictures, arrows, and more to annotate and beautify your map.

Migration-05

 Now that your map is ready, you may print it or save it to a PDF or graphic file to put online, add to a story, or share with others!

Would you like to learn more about Family Atlas and see it in action? Then watch our recorded webinar on Mapping Your Family Tree with Family Atlas.

Special Discount on Family Atlas

We are pleased to offer a limited-time discount on Family Atlas.  Through August 10, 2014, you can save $10 off the regular price and get Family Atlas for only $19.95 (plus s/h if you want the CD).  You must use the link below in order to get this discounted price.

www.rootsmagic.com/store/family-atlas/special.aspx

This special offer is only available until August 10, 2014 so get your copy of Family Atlas today!

Tip: Saving Your Spot in RootsMagic Using Bookmarks

 Bookmarks

Every person in your family tree is important, right?  As much as we may hate to admit it, sometimes certain persons are more important than others.  For example, imagine wandering around through the outskirts of your family tree when you realize it’s time to shut down for the night.  You wish there was a way that you could just pick up where you left off the next time you get on… and there is.

Meet your new friend the “Bookmark“.  Bookmarks work just like they sound… highlight a person on any of the main screens, press Ctrl+B (or do “Search > Bookmarks > Bookmark person” from the menu), and RootsMagic will remember that person for you.  Any person you bookmark will be listed in the Bookmarks tab of the side list like this…

Bookmarks

Just select any bookmark in the list and click Go, and RootsMagic will jump directly to that person.  There’s no limit as to how many bookmarks you create, although if the list gets too long you’ll want to make sure you read last weeks tip on incremental searching.  Your bookmarks are saved with your database so you can keep them as long as you wish, or you can highlight a bookmark in the list and click the red X to delete it.

Bookmarks are also great for when you need to temporarily go somewhere else in your tree and be able to quickly return to the current person.  Just bookmark the person you are on, go do whatever else you need to do in your tree, then quickly jump back to the original bookmarked person.

So remember, while every person in your family tree is important, bookmarks let you mark those that are the most important to you at the time. And, to avoid any hurt feelings, you might want to make sure any living family members don’t notice their absence from the bookmark list.