Tip: Finding Errors in Your Data with Problem Alerts

Problem Alerts

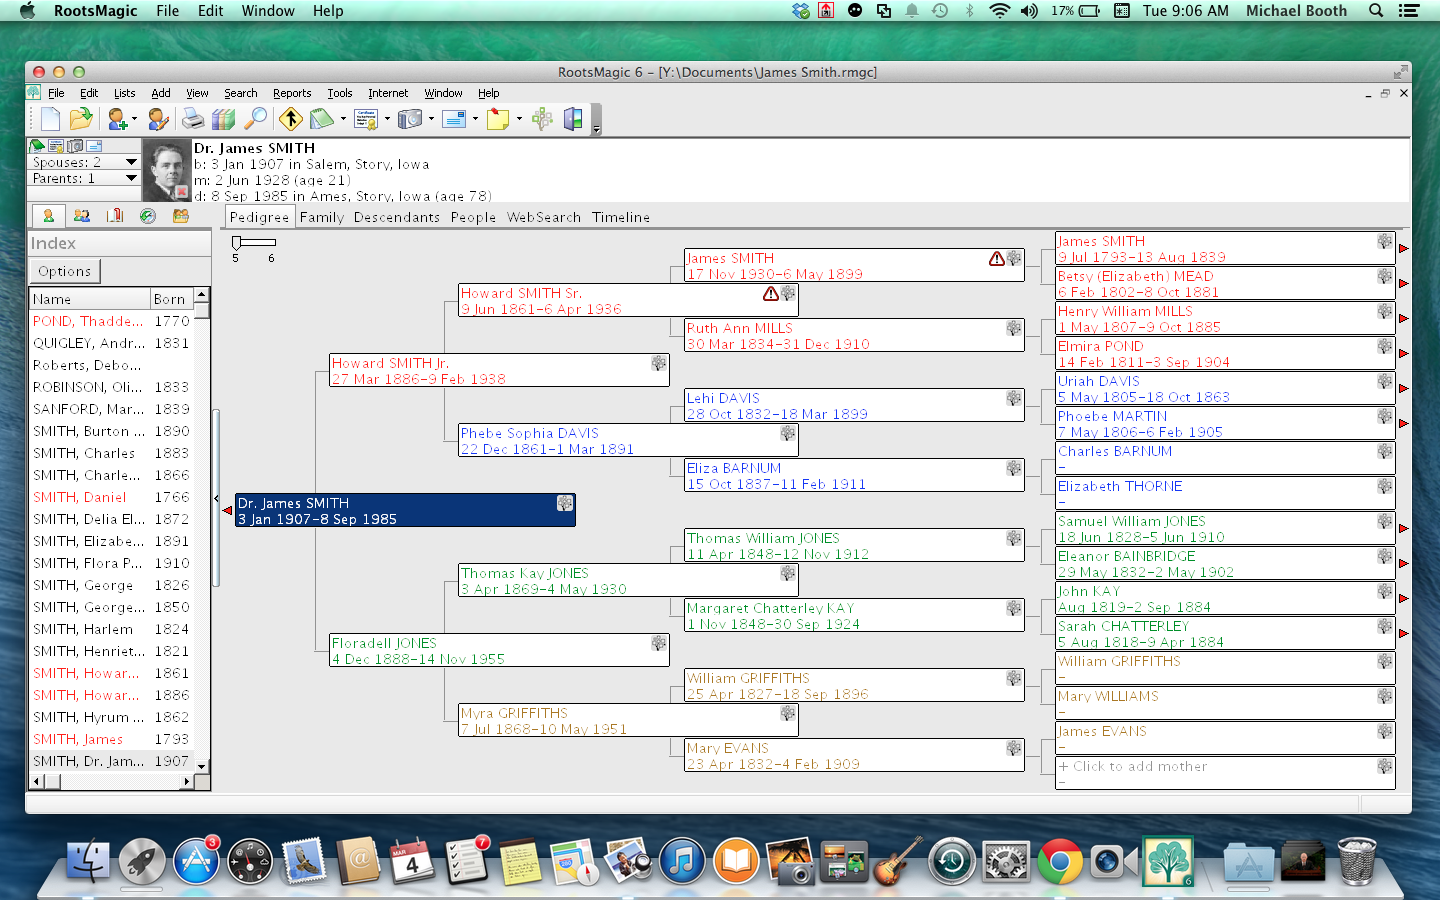
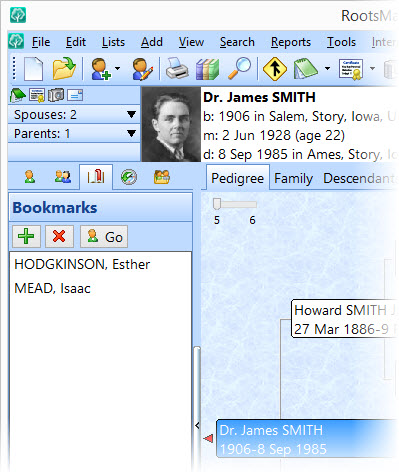
Have you ever noticed a little triangle symbol next to a person’s name in RootsMagic and wondered what it meant?  It means there just might be a problem with some of the information you have entered for that person.  That little symbol is called a “Problem Alert”, and will show up if RootsMagic thinks there is an issue you might need to look into.

2014-09-03_11-23-22

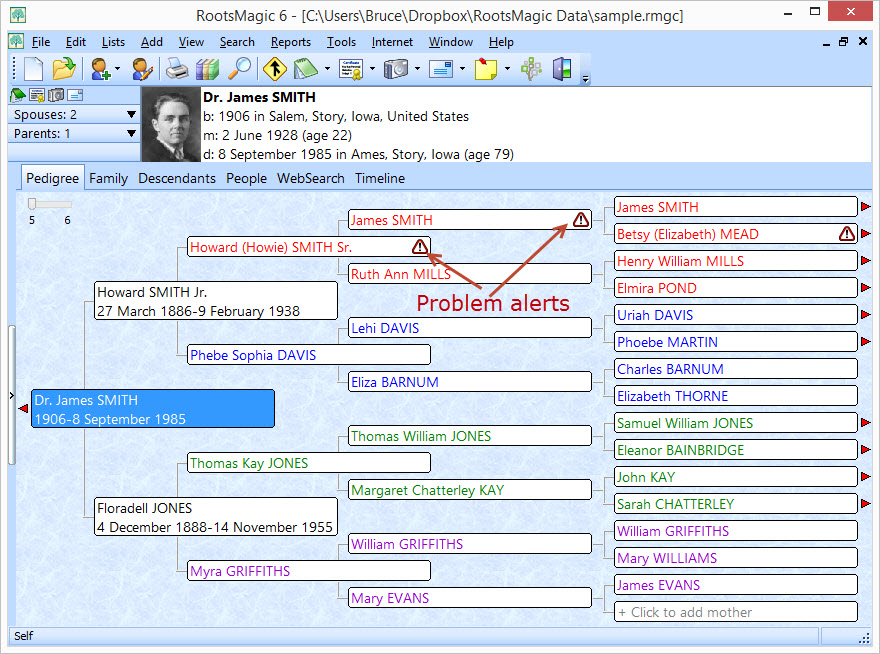
To see what RootsMagic wants you to check out, just click on the little symbol and the problem list will open for that person.  There may be just a single problem, or there may be multiple problems.  Some problems are limited to just that person, like dying before they were born.  Other problems might require looking at more than one person to figure out, like being born before their parents.

2014-09-03_11-25-26

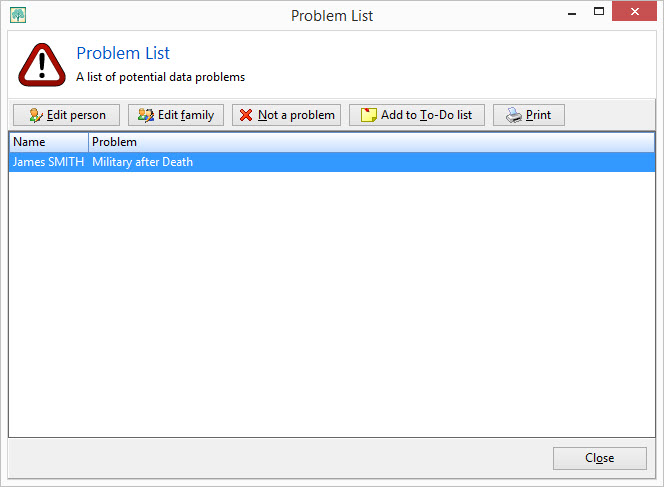
In addition to displaying a list of potential problems, the problem list also gives you a number of things you can do with the highlighted problem.  Edit Person will open the edit screen for the person, which is great for those individual problem types.  Edit Family will open a screen listing all of the family members for those problems which may lie with either the person or a family member.  And sometimes a potential problem isn’t a problem at all (maybe great aunt Martha really did live to be 106).  The Not a Problem button tells RootsMagic that the highlighted item isn’t really a problem and should be removed from the list.  And what if you don’t have time right now to figure out what the problem is?  You can click Add to To-Do List to put that potential problem in the person’s to-do list so you can work on it later.

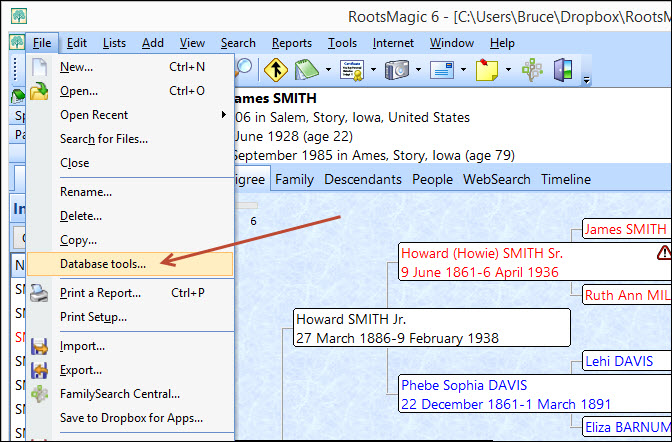
If for some reason you don’t want problem alerts to appear, or if you want to choose what types of problems RootsMagic should look for, do “Tools > File Options” from the main menu, then check whether to use the alerts or click the “Problem options” button.

2014-09-03_11-22-06

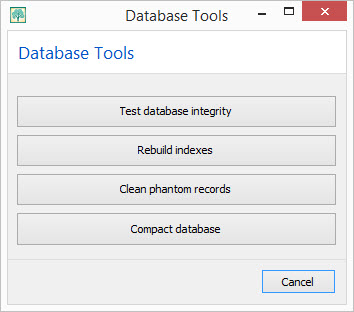
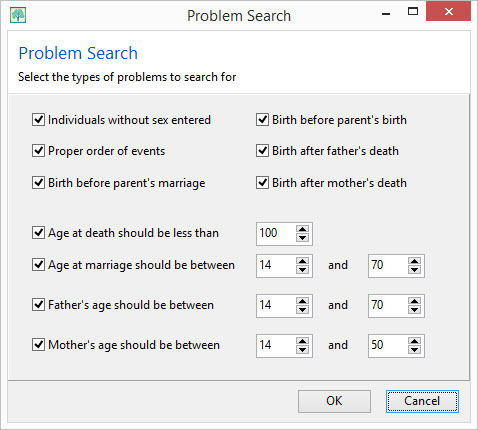
When you click “Problem options”, the following screen will let you choose which problems RootsMagic will look for.  In addition to selecting the types of problems, you can also adjust the range of values RootsMagic uses for various problem checks.

2014-09-03_11-22-56

If you want to see Problem Alerts in action, here is a short video we put together for you.

So don’t wait around to see if there are any problems in your data… let RootsMagic find them for you automatically!

Announcing MacBridge: Run RootsMagic on Your Mac without Windows

MacBridge for RootsMagic

One of the most common questions we are asked is, “When will RootsMagic run on a Mac?” With today’s release of MacBridge for RootsMagic 6, the answer is “right now”. MacBridge for RootsMagic 6 allows you easily install and run RootsMagic on your Mac in mere minutes with almost no additional setup or configuration.

MacBridge for RootsMagic is different than other solutions you may be familiar with. For starters, it does not install Windows on your Mac. It also does not create a slow and bulky virtual computer. It runs right on your Mac, using your Mac file system. You can even put the RootsMagic icon on your dock for easy one-click access! So while we are busily working on an actual native Mac version of RootsMagic, MacBridge for RootsMagic 6 gives you the ability to work on a Mac today.

MacBridge Screen

Want to see it for yourself? Here’s a short video demonstrating how quick and easy it is to download and install RootsMagic onto your Mac:

Still have questions? Take a look at our answers to some Frequently-Asked Questions about MacBridge for RootsMagic.

Currently, MacBridge for RootsMagic 6 is available only as a download. The regular price is $14.95 but for a limited time, you can get it for only $9.95. So if you or someone you know uses a Mac and has felt left out of the RootsMagic magic, do yourself (or them) a favor and check out MacBridge for RootsMagic today!

Tip: Keep Your File in Shape with Database Tools

Database Tools

Occasionally things break.  And when they do, we break out the tools to fix them.  Sometimes we even use tools preemptively to keep things from breaking later.  Databases are no different, and RootsMagic provides database tools to check the integrity of your database, or even fix issues like “phantom children” in your database.  To open the Database Tools, select File > Database tools from the menu.

2014-08-25_15-31-33

The Database Tools screen is very simple, with 4 commands to choose from.

2014-08-25_15-32-36

Each of the 4 commands simply performs the command and then pops up a status message (which may be no more than a simple “OK”).

Test Database Integrity

This command analyzes your RootsMagic file to check if there are any problems with the database structure itself.  These are not problems with data (like a person being born before their father), but are corruption within the data structure itself.  This type of corruption is rare, but it is important to check for it occasionally.

When this command finishes running it will either just display “OK” (which is what you want), or it may display a list of any corruption in the file.  Sometimes this corruption can be fixed by running one of the other database tools (like Rebuild Indexes), but sometimes the only recourse is to restore a backup.

You can run this command when you open your database to make sure there is no corruption before you start entering new information, or you can run it before creating a backup to make sure your database is good to go before backing it up.

Rebuild Indexes

Your RootsMagic file contains two things… data and indexes.  The data is what you actually type in (names, dates, places, notes, etc), while the indexes are what the RootsMagic database engine creates so that it can search for and find that data faster.  This command rebuilds those indexes.  Like any of the database tools, you can run this command anytime without worry, but it can be most useful if the Test Integrity check comes up with index errors.

Clean Phantom Records

This is probably the most useful of the database tools, or at least the one that you can see its effects.  Occasionally your database can pick up what we call “phantom records”.  These are unwanted pieces of information (sometimes blank) that appear in your database, but you are unable to remove them using the normal RootsMagic features.

For example, you may find a family with a “phantom child”… a blank row in the child list on the family view which you can’t unlink or delete using the regular Edit > Unlink or Edit > Delete commands.

This command will search your file for all kinds of phantom records and will remove them for you.  Again, it doesn’t hurt to run this feature even if you haven’t run across any phantom records yet.

Compact Database

When you delete a person or other item in RootsMagic, the program simply marks the record as deleted, but doesn’t free up the space the record was using.  Normally this isn’t a real problem, but if you are deleting a lot of records in RootsMagic, this command will reclaim that space and reduce the size of your RootsMagic file.

Database Tools in Action

Here is a short video we created showing the database tools in action.

Tip: Keep Private Notes Private

Private Notes

You just discovered some information about an ancestor that you want to document, but you know there are some family members that are going to throw a fit about it.  How do you document that information, yet be able to publish your family tree without sharing that information?  The answer is with private notes.

Private notes are available anywhere you need to enter a note: a person note, a family note, or an event note.  Go ahead and enter your note just as you normally would, even if it contained something you weren’t quite ready to share.

2014-08-14_17-06-10

When you print the note in a report (like the narrative report here), the note will print exactly as you entered it, including the information you’d like to keep private (you can click on the image below to see it better).

2014-08-15_10-53-47

So here’s how to privatize that information.  Just surround the text you’d like to keep private with curly brackets {these things}.  Notice below we put them around the text about the cousin being too drunk to deliver the baby.  You can see that it isn’t all or nothing… you can put the braces around any text buried inside the note, or around the total note.  You can even put braces around more than one thing in a single note if you have multiple items you want to keep private.

2014-08-14_17-07-10

Once you have added braces around the private text, you can choose in any report that prints notes, or when creating a GEDCOM file, to have that private text included or removed.  For example, when printing a narrative report, click the Options button…

2014-08-14_17-08-32

then on the Options screen you will see two items for you to choose how to handle the text between braces.  The first “Include private notes” lets you choose whether or not to print or export that text.  The second option “Strip { } brackets” is used when you DO include the notes.  If you check that option when printing the private notes, RootsMagic will remove the braces so they don’t stand out around the private text.

2014-08-14_17-09-12

Here is that same report as above with the private notes excluded.  RootsMagic has completely removed any text (including spaces) surrounded by the curly braces.

2014-08-15_10-54-11

So the next time you stumble across information you aren’t ready to share yet, use this tip to keep track of the information while keeping it private at the same time.

Tip: Finding Anything Anywhere in RootsMagic

Find Everywhere

One of your ancestors fought alongside Davy Crockett at the Alamo, and you’ve entered that information into your RootsMagic database.  Unfortunately you don’t remember which ancestor it was, or how to easily find him.  Luckily, RootsMagic makes it easy to find anything, anywhere in your database with Find Everywhere.

Find Everywhere does exactly what it sounds like.  You enter some text, and RootsMagic will display a list of everywhere in your database that text is found: people, names, places, notes, sources, citations, media, to-do items, research logs, and more.  Just do Search > Find Everywhere from the RootsMagic menu and the following form will open.

2014-08-07_20-50-39

You can search for a single word or phrase by just typing it into the first field.  Or you can search for a combination of words / phrases by entering them into separate fields and using the And/Or options.  You can also choose whether you want the results to match by case also.  For example, if you mark “Match case”, then “Smith” and “smith” will not match.

Click OK and RootsMagic will return a list of every place your desired text is found (in our example, the word “smith”).  Here we can see that it found a number of people with the name smith, whether 1) as a given name, or 2) as a surname.  It will also show you if any person notes have the word “smith” in them also.

2014-08-07_20-51-06

 As we scroll down the list we can see that Find Everywhere returned sources with the word “smith” in them as well.  It doesn’t matter if the desired text is in the name, footnote, bibliography, research notes, etc., RootsMagic will find it.

2014-08-07_20-52-30

 Scroll down even more and we see 4) places, 5) place details, 6) to-do items, 7) research logs, and 8) media items with the desired text.

2014-08-07_20-52-52

 And best of all, notice how every result has a blue title.  That title is a link you can click on to directly edit that piece of information directly from the Find Everywhere results.  And of course you can also print or save the results using those buttons on the results page.

So the next time you can’t remember where you put that little tidbit about an ancestor, let Find Everywhere do the dirty work for you.

Tip: Finding a Person by Nickname or Married Name

Name Find

 “Why can’t I find that person?  I know I entered them into my database!”  Maybe it is because you know them by a different name than the one you entered for them.

We are taught to enter the full birth name for a person, but that person may have changed their surname when they got married, or may have gone by a nickname.  If you do a simple search for that married nickname, you probably aren’t going to find them.

This is where a great feature called NameFind comes to the rescue.  Let’s say you are looking for Mary Smith.  You open the RootsMagic search list (Search > Person List or click the magnifying glass on the toolbar) but you don’t find Mary Smith in the list.  Here’s how you do it.

Just click the NameFind button on that list screen.

2014-07-31_15-09-18

That will open a form where you can enter the name of the person you are looking for.  Just type in the name of the person you are looking for and RootsMagic will begin its magic.   This screen looks quite simple, but is the gateway to a very powerful search which looks not only for a person entered with that name, but people who have that given name as their nickname, or that surname as a married name.  It even has an option to allow close matches, which will let it (for example) find Maria even if you looked for Mary.

2014-07-31_15-15-08

Once you’ve entered the name you are looking for (and clicked OK), RootsMagic will jump to the first person who matches.  Notice in this case we were searching for Mary Smith, but RootsMagic found Marianne Davis.  That’s because 1) Marianne’s nickname is Mary, and 2) she was married to George Smith.

2014-07-31_15-15-24

So there you have it- with RootsMagic’s NameFind, you can easily find anyone in your file, no matter what their maiden, married, or nicknames may be!

Tip: Make a Map of Your Family’s Migrations

Migration-Maps

Here at RootsMagic HQ, today is “Pioneer Day”, a local holiday where we celebrate our ancestors and the diverse peoples who settled this area. One fun project for Pioneer Day (or any day for that matter) is to make a map showing where our ancestors lived and how they migrated and moved about. There is just something special about looking at a visual map that communicates so much more than a printed list of places can.

FA-DVD-Box-Mockup

We happen to have a product which makes making these maps a snap. It’s called Family Atlas. Now, Family Atlas is a standalone program. You don’t need our RootsMagic software to use its features, although it can read your RootsMagic file as well as genealogy and map files from a variety of different sources.  One common use of it is to import your family data from your genealogy software and then create and print personalized family maps from that data. It is one-of-a-kind software that lets you visualize and publish your family history in a unique and compelling way. Be sure to read to the end of this tip to learn about a special limited-time discount on this software.

 When you first open Family Atlas, you’ll see a blank, interactive, zoomable world map. At this point, you need to add “Marker Sets” to add people, places, and events to your map. To do this, click on the Green “Plus” icon in the upper-left corner of the screen. The “Add Marker Set” screen will appear.

Migration-01

Click Place Marker Set and then OK. The “Edit Place Markers” screen will appear.

Migration-06

This is where you will add all the points that you want to plot on the map. First, give the marker set a title. Click Edit next to “Symbol” to change the color, shape, and connecting lines between each marker.  Click Add to add a new marker to this set. The “Edit Place Marker” screen will appear.

Migration-02

Add a label, date, and location for the marker. If Family Atlas recognizes the place, it will automatically add the Latitude and Longitude for you.  Click OK to finish adding the marker.  Repeat this last step for each marker that you wish to add.

Migration-03

Click OK to save your changes and return the the main screen. Here you can see your map. Pan and zoom the map however you wish. Feel free to explore the various details. You can click Atlas Options to change map colors, fonts, and more.

Migration-04

When you have the map colored and zoomed just as you want it, click Publish Map to take a snapshot of the map and open up the publisher tool.  Here you can add text, pictures, arrows, and more to annotate and beautify your map.

Migration-05

 Now that your map is ready, you may print it or save it to a PDF or graphic file to put online, add to a story, or share with others!

Would you like to learn more about Family Atlas and see it in action? Then watch our recorded webinar on Mapping Your Family Tree with Family Atlas.

Special Discount on Family Atlas

We are pleased to offer a limited-time discount on Family Atlas.  Through August 10, 2014, you can save $10 off the regular price and get Family Atlas for only $19.95 (plus s/h if you want the CD).  You must use the link below in order to get this discounted price.

www.rootsmagic.com/store/family-atlas/special.aspx

This special offer is only available until August 10, 2014 so get your copy of Family Atlas today!

Tip: Saving Your Spot in RootsMagic Using Bookmarks

 Bookmarks

Every person in your family tree is important, right?  As much as we may hate to admit it, sometimes certain persons are more important than others.  For example, imagine wandering around through the outskirts of your family tree when you realize it’s time to shut down for the night.  You wish there was a way that you could just pick up where you left off the next time you get on… and there is.

Meet your new friend the “Bookmark“.  Bookmarks work just like they sound… highlight a person on any of the main screens, press Ctrl+B (or do “Search > Bookmarks > Bookmark person” from the menu), and RootsMagic will remember that person for you.  Any person you bookmark will be listed in the Bookmarks tab of the side list like this…

Bookmarks

Just select any bookmark in the list and click Go, and RootsMagic will jump directly to that person.  There’s no limit as to how many bookmarks you create, although if the list gets too long you’ll want to make sure you read last weeks tip on incremental searching.  Your bookmarks are saved with your database so you can keep them as long as you wish, or you can highlight a bookmark in the list and click the red X to delete it.

Bookmarks are also great for when you need to temporarily go somewhere else in your tree and be able to quickly return to the current person.  Just bookmark the person you are on, go do whatever else you need to do in your tree, then quickly jump back to the original bookmarked person.

So remember, while every person in your family tree is important, bookmarks let you mark those that are the most important to you at the time. And, to avoid any hurt feelings, you might want to make sure any living family members don’t notice their absence from the bookmark list.

Tip: Find Exactly What You Want with a Few Keystrokes

IncSearch

You’re looking at the index of people on the main RootsMagic screen.  You see “Aldred, Mary” but you want to move to “Taylor, William”. Your only hope is to scroll down through the list, past thousands of names and 20 letters of the alphabet until you find what you’re looking for, right?

Sadly, we see this happening all too often, even with experienced RootsMagic users. The saddest part of all this is that it is completely unnecessary with RootsMagic’s fantastic incremental searching.

How does it work?

Step 1) Click anywhere inside whatever list you want to search in order to “select” that list. You can tell if it is selected because the colored bar highlighting the selected record will be blue instead of gray.

IncSearch1

Step 2) Start typing the text you want to search for. RootsMagic will automatically jump to the first matching record and will put an orange box around the text that you’re searching for.

IncSearch2

Step 3) Keep typing the text you want to search for until you find what you’re looking for. In the case of a list of names, once you match the surname, press the , (comma) key to start searching on given names.

IncSearch3

Step 4) If searching a list of names, start typing letters of the given names until you find the record you are looking for.

IncSearch4

That’s it! You just jumped through thousands of names from “Alred, Mary” to “Taylor, William” with just 8 keystrokes!

IncSearch5

And the best thing? It will work on almost every list in RootsMagic! Try it on lists of places, sources, fact types, and more to quickly find the record you need.

So if you haven’t used this feature in RootsMagic, what are you waiting for? Try it for yourself. And the next time you see someone slowly scrolling through a list in RootsMagic, share this time-saving tip with them. You’ll have the satisfaction of knowing that you saved someone from  hours of unnecessary scrolling and be promoted to “RootsMagic Hero” in their eyes.

Tip: Know Your Relationships

Relationships

As you’re exploring around your family tree, do you ever think, “Who is ‘Lysander Liske’ and how is he related to me?” Followed by, “Hmm. You don’t see many babies named ‘Lysander’ anymore.”  While RootsMagic doesn’t have the power to name babies, it does have the ability to always show you your relationship to the selected person on the main screen.

To display the relationships as you navigate around the main views, do Tools > Set Relationships from the main menu.  RootsMagic will bring up the following form where you can simply click the Set relationships button, or you can click the Change… button to select a different person to set the relationships for first.

SetRelationships

RootsMagic will scan through your database and set each person’s relationship to the person you selected on the form.  Then as you navigate around the various views, RootsMagic will display that relationship in the status bar at the bottom of the screen.

StatusBarRelationship

In this example, the relationship between the highlighted person (William Thomas Lloyd) and the selected person (Dr. James Smith) is first cousin twice removed.  As you move from person to person in your file, the status line at the bottom of the screen will be updated to show the relationship between the highlighted person and the originally selected person.

You can easily select anyone in the database and set the relationships relative to that person, so it’s easy to display everyone’s relationship to you, and then change it to show the relationships to an ancestor you are researching.  One important point to this though is that when you set the relationships, it sets them for the people currently in the file.  If you add additional people to your file after setting relationships you will need to redo the Set Relationship command to include those new individuals.

And with that tip, “Congratulations”, meet your “second-cousin 3 times removed”, “Lysander Liske”!