Tip: Find Exactly What You Want with a Few Keystrokes

IncSearch

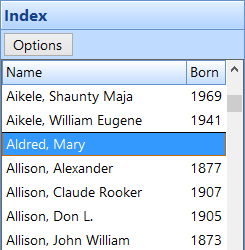
You’re looking at the index of people on the main RootsMagic screen.  You see “Aldred, Mary” but you want to move to “Taylor, William”. Your only hope is to scroll down through the list, past thousands of names and 20 letters of the alphabet until you find what you’re looking for, right?

Sadly, we see this happening all too often, even with experienced RootsMagic users. The saddest part of all this is that it is completely unnecessary with RootsMagic’s fantastic incremental searching.

How does it work?

Step 1) Click anywhere inside whatever list you want to search in order to “select” that list. You can tell if it is selected because the colored bar highlighting the selected record will be blue instead of gray.

IncSearch1

Step 2) Start typing the text you want to search for. RootsMagic will automatically jump to the first matching record and will put an orange box around the text that you’re searching for.

IncSearch2

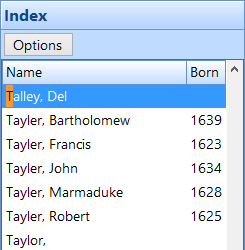
Step 3) Keep typing the text you want to search for until you find what you’re looking for. In the case of a list of names, once you match the surname, press the , (comma) key to start searching on given names.

IncSearch3

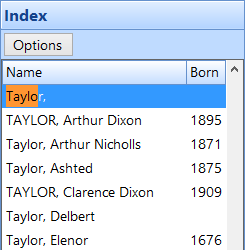
Step 4) If searching a list of names, start typing letters of the given names until you find the record you are looking for.

IncSearch4

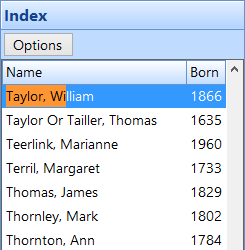
That’s it! You just jumped through thousands of names from “Alred, Mary” to “Taylor, William” with just 8 keystrokes!

IncSearch5

And the best thing? It will work on almost every list in RootsMagic! Try it on lists of places, sources, fact types, and more to quickly find the record you need.

So if you haven’t used this feature in RootsMagic, what are you waiting for? Try it for yourself. And the next time you see someone slowly scrolling through a list in RootsMagic, share this time-saving tip with them. You’ll have the satisfaction of knowing that you saved someone from  hours of unnecessary scrolling and be promoted to “RootsMagic Hero” in their eyes.

Tip: Know Your Relationships

Relationships

As you’re exploring around your family tree, do you ever think, “Who is ‘Lysander Liske’ and how is he related to me?” Followed by, “Hmm. You don’t see many babies named ‘Lysander’ anymore.”  While RootsMagic doesn’t have the power to name babies, it does have the ability to always show you your relationship to the selected person on the main screen.

To display the relationships as you navigate around the main views, do Tools > Set Relationships from the main menu.  RootsMagic will bring up the following form where you can simply click the Set relationships button, or you can click the Change… button to select a different person to set the relationships for first.

SetRelationships

RootsMagic will scan through your database and set each person’s relationship to the person you selected on the form.  Then as you navigate around the various views, RootsMagic will display that relationship in the status bar at the bottom of the screen.

StatusBarRelationship

In this example, the relationship between the highlighted person (William Thomas Lloyd) and the selected person (Dr. James Smith) is first cousin twice removed.  As you move from person to person in your file, the status line at the bottom of the screen will be updated to show the relationship between the highlighted person and the originally selected person.

You can easily select anyone in the database and set the relationships relative to that person, so it’s easy to display everyone’s relationship to you, and then change it to show the relationships to an ancestor you are researching.  One important point to this though is that when you set the relationships, it sets them for the people currently in the file.  If you add additional people to your file after setting relationships you will need to redo the Set Relationship command to include those new individuals.

And with that tip, “Congratulations”, meet your “second-cousin 3 times removed”, “Lysander Liske”!


Tip: Easily Follow the Fathers (and Sons)

FathersDay

Many of our user’s around the world will be celebrating Father’s Day this weekend. In commemoration, I’m going to show you a unique feature in RootsMagic that makes working with lines of fathers (and even sons) a snap. Isolating lines of fathers and sons can be useful in genetic genealogy when you need to find just those men in your file that should share the same Y-Chromosome. Others have used this feature for surname studies, tracking legal records, and more.

The magic happens in the “Select People” screen. You’ll see this screen when you go to export a GEDCOM file, select people to color code, print a report for a group of people, publish a website online, and more. Any time you need to select a group of people to work with.

Fathers-1

Type the name (surname, given name) of the starting person of the line you wish to select. Once the person is selected, click on the Mark group button then select Genetic lines of highlighted person.

Fathers-2

Here you have several options. To select the line of fathers for the highlighted person, choose Y-Chromosome Line (Y-STR). If you select Ancestors of highlighted person, you’ll follow the line of fathers up the tree. If you select Descendants of highlighted person, you’ll follow the line of sons down the tree. Click OK twice to complete the selection.

Fathers-3

Ta-da! You’ve now isolated a line of fathers and sons! Happy Father’s Day  to all those important men in our lives.

P.S. – We don’t want mothers to feel left out of the excitement. Astute readers will have noticed the option to select a genetic line based on Mitochondrial DNA Line (mitDNA).  Since Mitocondrial DNA is passed directly from mother to child so this option will similarly allow you to isolate a line of mothers and daughters.

Tip: Never Get Lost in Your Tree with Color Coding

Color Coding

Have you ever started exploring around your family tree and found yourself lost, unsure which line to follow to get back down to your more recent ancestors? The Color Coding feature in RootsMagic makes it easy to leave yourself “breadcrumbs” so that you always know which people are your direct-line ancestors.

The first thing to do is to find yourself on the RootsMagic main screen. Once you’re selected yourself, choose Tools > Color Code People from the main menu. You’ll see this screen:

ColorCoding-2

Choose whichever color you like from the Set color box (I prefer something that really stands out). Select Ancestors of current person and then click OK. You’ll now see that all the ancestors of the selected person will appear in the selected color, whether on the main screen or in various reports and charts.

ColorCoding-3

Now if you ever get lost in the upper-branches of your tree, just click on the Family view and look at the list of children:

ColorCoding-4

Whichever child is marked in your selected color is a direct-line ancestor. Just click on the arrow to the left of the name to climb down the tree until you reach familiar territory.

Of course, this is just one possible use for Color Coding. Not only can you color lines of ancestors and descendants, but you can also color people based on endless criteria such as where they were born, if they are missing information, if they are the end-of-the-line, etc. You can use up to 14 different colors, each with a different meaning of your own choosing.

To learn more about Color Coding, be sure to watch our short video demonstrating it:

Tip: Get Research Help with RootsMagic and GenSmarts

GenSmarts Tip

Have you ever stared at your RootsMagic screen wondering where to look next (or maybe even where to start)? There are so many record types and websites to search that you aren’t even sure where to begin.  Or maybe you are a seasoned genealogist who just wants to make sure you don’t overlook anything.  Did you know there is a program called GenSmarts which can help you choose which records to search for any person in your file?

And best of all, we have the chance to offer a special discount on GenSmarts for a limited time.

Research Suggestions from GenSmarts

GenSmarts is a program that makes research recommendations for people in your RootsMagic file.  If you have GenSmarts installed, you can highlight any person in your file, then select Tools > GenSmarts Suggestions from the RootsMagic menu, and RootsMagic will display a list of research suggestions for that person.

GenSmartsSuggestions

So how does GenSmarts come up with these suggestions?  It creates a profile of your ancestor based on where and when they lived, and then matches that profile with its inventory of known records to make predictions about the record trail your ancestors may have left behind.  Each suggestion will include the logic behind the suggestion, and where that type of record can be found.  Keep in mind that these are suggestions… GenSmarts doesn’t know if your ancestor is in a particular record, just that it is the type of record your ancestor is likely to show up in.

If a record type is available online, you can just click the “Look online” button and GenSmarts will attempt to find your ancestor in those records.  GenSmarts knows which online sites have which records, so it knows whether to search FamilySearch, Ancestry, FindAGrave, or whatever other site has that particular record type.  If more than one site has the records, it will default to the free site.

What if a suggestion is only available from a pay site (like Ancestry), but you don’t have a subscription?  GenSmarts will take you to the “teaser page” of the site so you can get an idea whether a record exists for your ancestor.  You can then add the suggestion to the RootsMagic person’s to-do list, and later print out a list of all the suggestions you need to pursue for a particular website.  You can then take that list to the local library or Family History Center where you can do the actual search.  This little trick (as well as other GenSmarts features) is shown in the video below.

Note: GenSmarts is primarily focused on US, Canadian, and UK records, but there is a little support for records in some other countries.  If you have other questions about GenSmarts, here is a list of Frequently Asked Questions.

Special Discount on GenSmarts

The folks at GenSmarts have allowed us to offer a limited time discount on GenSmarts.

GenSmarts is available either as a download or on CD (not both).  The discounted price is $19.95 for the download, or $24.95 (plus s/h) for the CD.  You must use the link below in order to get this discounted price.

http://rootsmagic.com/store/gensmarts/special.aspx

This special offer is only available until June 15th, 2014. So get your copy of GenSmarts today!

Tip: Planning Cemetery Trips with RootsMagic

Cemetery

It’s Memorial Day weekend in the United States which means that many of you will be visiting gravesites of friends and family to honor and remember them. Did you know that RootsMagic can help you plan your visits and make sure that you don’t miss any ancestral resting spots?

Listing Everyone Buried in a Location

Would you like to have a list of everyone who was buried in a given location? The Individual List in RootsMagic does just what you need.  To create the report:

1. Choose Reports > Print a Report from the Main Menu.

Memorial Day 1

2. Select Individual List from the report types and click Create Report. The Report Settings screen will appear.

Memorial Day 2

3. In the People to print option, choose Selected people

4. In the People to include box, choose Select from list. The Select People screen will appear.

Memorial Day 3

 5. Click on the Mark group button, then choose Select people by data fields. The Search for information screen will appear.

Memorial Day 4

6. In the first row, set the options to Burial, place, contains, and the name of the location you wish to search.

7. Click OK three times until you return to the Report Settings screen.

8. Check/Uncheck any options from the Information to include section to you wish to show or hide.

9. Click Generate Report to see the list.

Memorial Day 5

Voila! You now have a list of all individuals in your file that are buried in a given location. You can also experiment with different options to include precisely the people and information you need for your trip.

And while you’re there, don’t forget to take pictures of the gravesites and record GPS coordinates to record in RootsMagic for later. But that’s the subject of another tip for another day.

Happy Memorial Day!